The average home loses 20 to 30 percent of its conditioned air through leaky ductwork before that air ever reaches a living space. That translates to hundreds of dollars wasted each year, rooms that never reach a comfortable temperature, and HVAC equipment that works harder and fails sooner. Duct leakage testing is the diagnostic process that quantifies these losses, giving homeowners and technicians the data they need to fix the problem. Two primary methods dominate the field: the Blower Door test, which pressurizes the entire building envelope, and the Duct Blaster test, which pressurizes the duct system directly. This article covers both methods in detail, including their principles, procedures, metrics, and how they work together to deliver a complete picture of duct system performance.
Understanding Duct Systems and Leakage
A residential duct system consists of several interconnected components. Supply ducts carry conditioned air from the furnace or air handler to individual rooms. Return ducts draw air from those rooms back to the equipment for reconditioning. The plenum is the enclosed chamber attached directly to the air handler that distributes or collects airflow. Throughout the system, numerous connections, fittings, transitions, and branch takeoffs create potential failure points.
Types of Duct Leakage
- Supply leakage: Conditioned air escapes from the supply side into unconditioned spaces such as attics, crawlspaces, or wall cavities. The homeowner pays to heat or cool air that never reaches the intended room.
- Return leakage: Unconditioned, often contaminated air is drawn into the return side from attics, garages, or crawlspaces. This introduces dust, allergens, moisture, and even combustion gases into the airstream.
- Total leakage: The combined volume of supply and return leakage across the entire duct system.
Common Causes
- Poorly sealed joints and longitudinal seams
- Tears, punctures, or crushed sections in flexible ductwork
- Completely disconnected duct runs
- Failed or missing mastic at boot-to-drywall connections
- Aging materials, including deteriorating fabric connectors and dried-out sealants
Impact of Leakage
The Department of Energy estimates that duct losses in a typical home can account for 25 to 40 percent of the energy consumed by the HVAC system. Beyond wasted energy, leaky ducts create pressure imbalances that pull outdoor air, soil gases, and attic contaminants into the living space. Rooms served by leaking supply runs receive reduced airflow, producing hot and cold spots. The HVAC equipment compensates by running longer cycles, increasing wear on compressors, blower motors, and heat exchangers while raising utility bills by $200 to $400 or more per year in many climates.
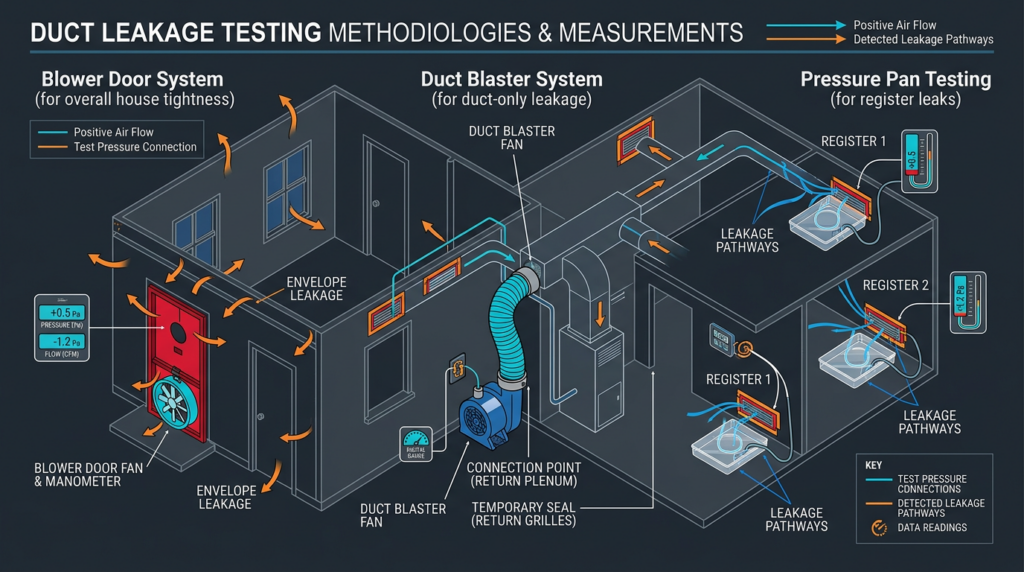
Blower Door Testing: Whole-House Pressurization
Principle of Operation
A Blower Door is a calibrated fan mounted in an adjustable frame that fits into an exterior doorway. The technician closes all exterior windows, doors, and fireplace dampers, then uses the fan to either depressurize or pressurize the entire house. By creating a known pressure difference between indoors and outdoors, typically 50 Pascals (Pa), and measuring the airflow required to sustain that difference, the test quantifies total air leakage through the building envelope.
Key Metrics
- CFM50 (Cubic Feet per Minute at 50 Pascals): The volume of air the fan must move to hold the house at a 50 Pa pressure difference. Higher numbers mean more leakage.
- ACH50 (Air Changes per Hour at 50 Pascals): CFM50 multiplied by 60 and divided by the conditioned volume of the home. This normalizes the result by house size. New construction targets often fall between 3 and 5 ACH50, depending on climate zone and code.
- Effective Leakage Area (ELA): A calculated value representing the size of a single hypothetical hole that would leak the same total volume of air as all the building’s leaks combined.
Procedure Overview
- Initial inspection: Walk the home, note existing conditions, and document exterior door and window positions.
- Prepare the house: Close all exterior openings. Open all interior doors. Shut off combustion appliances if depressurizing. Close fireplace dampers.
- Install the Blower Door: Fit the adjustable frame and nylon panel into an exterior doorway. Mount the calibrated fan and connect tubing to the digital manometer.
- Calibrate and test: Zero the manometer, then run the fan to reach the target pressure of negative 50 Pa (depressurization) or positive 50 Pa (pressurization). Record the airflow.
- Calculate results: Derive CFM50, ACH50, and ELA from the recorded data.
Limitations
A Blower Door measures total building envelope leakage, not duct leakage alone. Wind speeds above 15 mph can skew results. The test does not pinpoint individual leak locations without supplemental tools such as smoke pencils or thermal imaging cameras. Because the metric captures every gap in the building shell, isolating the duct contribution requires additional steps or a separate Duct Blaster test.
Duct Blaster Testing: Direct Duct Pressurization
Principle of Operation
A Duct Blaster is a smaller calibrated fan designed to pressurize or depressurize only the duct system. The technician seals every supply register and return grille, connects the Duct Blaster to the duct system at the air handler cabinet or a strategically chosen register opening, and pressurizes the ducts to a standard test pressure of 25 Pascals. The airflow the fan must deliver to hold that pressure equals the total volume of air escaping through duct leaks.
Key Metrics
- CFM25 (Cubic Feet per Minute at 25 Pascals): The airflow needed to maintain 25 Pa in the sealed duct system. Lower numbers indicate tighter ducts.
- Leakage as a percentage of system airflow: CFM25 divided by the total design airflow of the HVAC system, expressed as a percentage. Many codes and programs target 4 percent or less for new construction.
Procedure Overview
- Seal all registers: Cover every supply and return opening with adhesive-backed register covers or quality masking materials.
- Connect the Duct Blaster: Attach the fan to the duct system, usually at the air handler or a large return grille opening. Connect the digital manometer with reference tubing.
- Pressurize and measure: Run the fan until the duct system reaches 25 Pa. Record the CFM25 reading. Use interchangeable flow rings or orifice plates to match the fan’s measurement range to the leakage level.
- Calculate results: Compare CFM25 to the system’s rated airflow and to applicable code thresholds.
Types of Duct Blaster Tests
- Total duct leakage: All registers sealed, entire system pressurized. Measures leakage to both conditioned and unconditioned spaces.
- Leakage to outside only: Performed with the house simultaneously pressurized to the same 25 Pa by a Blower Door, effectively canceling any leakage path between the ducts and the conditioned space. The remaining measured airflow represents only the air escaping to the outdoors.
- Supply-side or return-side isolation: Sealing off one side of the system to test the other independently, helping technicians locate the dominant leakage source.
Advantages and Limitations
The Duct Blaster directly quantifies duct leakage without interference from other building envelope leaks. It can isolate supply from return leakage and help pinpoint problem sections. However, it requires physical access to the duct system, and extremely large breaches such as a fully disconnected duct run may exceed the fan’s capacity, requiring partial repairs before an accurate reading is possible. Equipment accuracy is typically plus or minus 3 to 5 percent, with regular calibration essential for reliable results.
Combining Blower Door and Duct Blaster for Comprehensive Analysis
Using both tools together yields the most complete diagnostic picture. The combined approach separates duct leakage from envelope leakage and identifies whether conditioned air is escaping to the outdoors or simply leaking within the building envelope.
Measuring Duct Leakage to Outside
The technician runs the Blower Door to pressurize the house to 25 Pa while simultaneously running the Duct Blaster to pressurize the ducts to the same 25 Pa. Because the pressure across any duct leak that opens into conditioned space is now zero, no air flows through those leaks. The only airflow the Duct Blaster registers is air escaping through leaks that lead to unconditioned or outdoor spaces. This metric, often called leakage to outside, is the number most energy codes care about because it represents a direct energy penalty.
Estimating Duct Leakage to Inside
Subtract the leakage-to-outside value from the total duct leakage value. The difference approximates the volume of conditioned air leaking into the home’s conditioned spaces. While this leakage does not carry the same energy penalty, it still disrupts designed airflow patterns and can cause pressure imbalances between rooms.
Using Supplemental Diagnostic Tools
During either test, technicians often use smoke pencils or theatrical fog machines to visually trace leak paths. Thermal imaging cameras reveal temperature differentials along duct runs and at connections, making invisible leaks visible. These tools turn a quantitative test into a precise leak-location exercise.
Interpreting Results and Meeting Standards
Acceptable duct leakage rates depend on the applicable building code, climate zone, and whether the building is new construction or an existing retrofit. The 2021 International Energy Conservation Code (IECC) requires total duct leakage of no more than 4 CFM25 per 100 square feet of conditioned floor area for post-construction testing. Some jurisdictions and above-code programs set tighter limits, requiring leakage to outside of 4 percent or less of total system airflow.
ACCA Manual D and ASHRAE Standard 152 provide additional guidance on duct design and efficiency calculations. ENERGY STAR Certified Homes programs typically require third-party verification of duct leakage results.
Factors That Influence Targets
- Climate zone: Colder and hotter climates carry stricter efficiency requirements.
- Duct location: Ducts inside the conditioned envelope have more lenient leakage-to-outside thresholds because leakage stays within the thermal boundary.
- Building age: Existing homes may not be held to current code but still benefit significantly from duct sealing.
- System capacity: Larger systems tolerate a higher absolute CFM25 value, but the percentage-of-airflow metric stays constant.
Sealing and Repairing Duct Leaks
Common Leak Locations
- Transverse joints where duct sections connect
- Longitudinal seams on sheet metal ducts
- Boot-to-drywall connections at supply registers
- Return platform plenums built from stud cavities and drywall
- Air handler cabinet seams and filter access panels
- Takeoff collars and branch connections
Sealing Materials and Techniques
- Mastic sealant: A thick, fiber-reinforced paste applied with a brush or gloved hand over joints and seams. Mastic remains flexible after curing and handles vibration well. It is the preferred sealant for most permanent duct sealing work.
- UL 181-listed foil tape: Pressure-sensitive aluminum tape rated for ductwork. Standard cloth “duct tape” is not suitable for HVAC ducts because it dries out and fails within a few years.
- Aerosol-based duct sealant: Products such as Aeroseal inject an aerosolized polymer into the pressurized duct system. The particles collect at leak edges and build up until the gap is sealed. This method reaches leaks inside walls and other inaccessible areas. Professional application is required.
Best Practices
- Clean all surfaces of dust and debris before applying mastic or tape.
- Use mastic with embedded fiberglass mesh tape for gaps wider than 1/4 inch.
- Apply sealant generously, covering at least one inch beyond each side of a joint.
- Mechanically fasten duct connections with sheet metal screws or draw bands before sealing.
- Insulate ducts in unconditioned spaces to at least R-8, or to the level required by local code, after sealing is complete.
- Perform a post-sealing Duct Blaster test to verify results and document improvement.
Common Misconceptions About Duct Leakage
- “Some leakage is normal in older homes, so it is not worth fixing.” Older homes often have the worst leakage and stand to gain the most from sealing. Payback periods are frequently under three years.
- “If I cannot feel a draft, there is no leak.” Many significant leaks occur in concealed spaces such as attics and crawlspaces where occupants never notice them.
- “Any tape works on ducts.” Only UL 181-listed foil or butyl tape is rated for long-term duct sealing. Standard cloth duct tape fails within one to five years.
- “Duct sealing is only about saving energy.” It also reduces dust infiltration, improves humidity control, lowers the risk of backdrafting combustion appliances, and extends equipment life.
- “Testing is only required for new construction.” While codes mandate testing for new builds, existing homes benefit equally from diagnostic testing and targeted sealing.
Benefits and Return on Investment
The EPA estimates that sealing and insulating ductwork can reduce heating and cooling costs by up to 20 percent. For a household spending $2,000 annually on energy, that represents $400 in yearly savings. Professional duct sealing typically costs between $1,500 and $3,000, yielding a payback period of roughly four to seven years, often less when combined with utility rebates or weatherization incentives.
Beyond cost savings, sealed ducts deliver more uniform temperatures across rooms, reduce indoor particulate levels, and lower the static pressure the blower motor works against. Lower operating stress translates to fewer repair calls and a longer equipment lifespan. Homes with documented duct testing and sealing also score better on home energy ratings, increasing resale value.
Key Takeaways
- Duct leakage is one of the largest single sources of energy waste in residential buildings, with typical losses ranging from 20 to 30 percent of system airflow.
- Blower Door testing quantifies total building envelope leakage at 50 Pa and provides baseline metrics such as CFM50 and ACH50.
- Duct Blaster testing directly measures duct system leakage at 25 Pa, reporting results in CFM25 and as a percentage of system airflow.
- Combining both methods isolates duct leakage to outside from leakage to conditioned space, giving the most actionable diagnostic data.
- The 2021 IECC sets a maximum total duct leakage of 4 CFM25 per 100 square feet of conditioned floor area for new construction.
- Mastic sealant and UL 181-listed foil tape are the industry-standard materials for permanent duct sealing. Aerosol-based sealants address leaks in inaccessible locations.
- Professional duct sealing typically pays for itself within four to seven years through reduced energy costs, improved comfort, better indoor air quality, and extended HVAC equipment life.
Whether you are building a new home, upgrading an existing system, or simply trying to eliminate that one room that never reaches the right temperature, duct leakage testing with Blower Door and Duct Blaster methods provides the hard data needed to make informed, cost-effective repairs. A qualified HVAC technician or energy auditor can perform both tests in a single visit, delivering a clear baseline and a prioritized action plan for sealing your duct system.