Radiant Floor Heating: Types, Installation, and Controls
Radiant floor heating (RFH) delivers warmth by circulating heat through the floor surface, which then radiates upward to warm people and objects in the room rather than blowing heated air through ductwork. This principle of radiant heat transfer produces exceptionally even temperatures from floor to ceiling, eliminates the drafts and dust circulation associated with forced-air systems, and operates in near silence. RFH systems can reduce energy consumption by 25% to 30% compared to conventional forced-air heating because they operate at lower supply temperatures and minimize heat stratification near the ceiling. Once considered a luxury reserved for high-end construction, radiant floor heating has become increasingly accessible for both new builds and retrofit projects thanks to improved materials, simplified installation methods, and smarter controls. This article covers the primary system types, installation techniques, control strategies, maintenance requirements, and common misconceptions surrounding radiant floor heating.
Types of Radiant Floor Heating Systems
Radiant floor heating falls into two main categories: hydronic systems that circulate heated water and electric systems that use resistance heating elements. Each type serves different applications, budgets, and performance requirements.
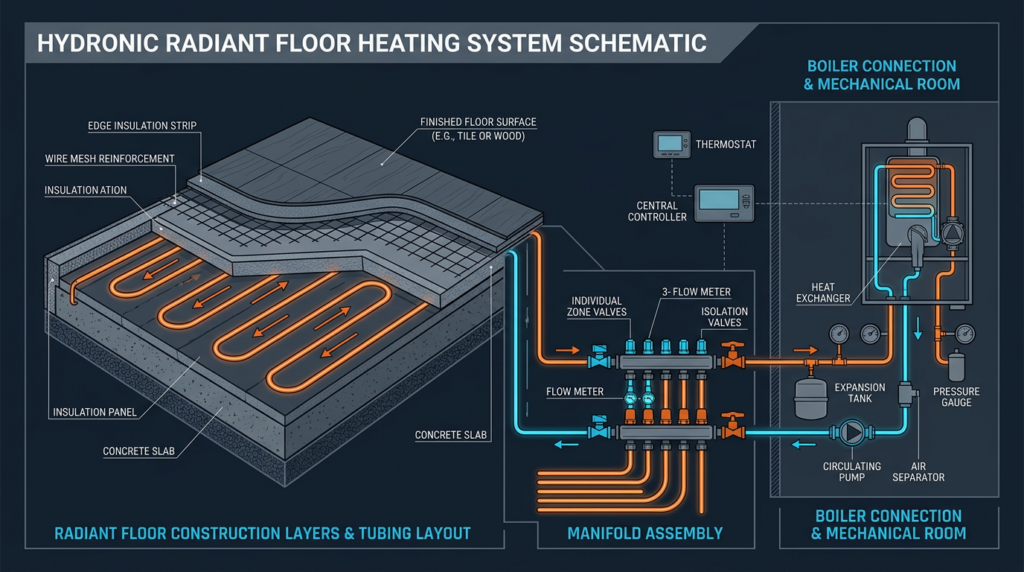
Hydronic Radiant Floor Heating
Hydronic radiant floor heating circulates warm water through tubing embedded in or beneath the floor structure. It is the most popular and cost-effective option for whole-house heating and large-area applications.
Key components of a hydronic system include:
- Heat source: Options include gas or propane boilers, electric boilers, air-source or ground-source heat pumps, solar thermal collectors, and geothermal systems. Modern condensing boilers achieve Annual Fuel Utilization Efficiency (AFUE) ratings of 95% or higher, making them well suited to the low supply temperatures (typically 80°F to 140°F) that radiant floors require. Heat pumps paired with radiant floors can reach coefficients of performance (COP) of 3.0 to 4.5, further reducing operating costs and carbon emissions.
- Manifold: The distribution hub that divides heated water into individual floor loops and collects return water. Quality manifolds feature individual loop shutoff valves, flow meters for balancing, zone actuators for independent room control, and air vents. Most manifolds are constructed from brass or stainless steel and accommodate anywhere from 2 to 12 loops.
- Tubing: PEX (cross-linked polyethylene) is the industry standard, available as PEX-a (Engel method, most flexible), PEX-b (silane method, most common), and PEX-c (electron beam method). PE-RT (polyethylene of raised temperature resistance) is an alternative that can be heat-fused at joints, eliminating mechanical fittings within the slab. Tubing is typically 1/2-inch outside diameter for residential applications and 3/8-inch for thinner profiles. All tubing used in closed hydronic systems must include an oxygen diffusion barrier (meeting DIN 4726 standards) to prevent corrosion of ferrous components such as boilers and cast-iron manifolds.
- Circulator pump: Moves water through the system. Modern variable-speed ECM (electronically commutated motor) circulators adjust flow rate based on real-time demand, consuming as little as 5 to 45 watts compared to 75 to 250 watts for older fixed-speed pumps. This alone can save $50 to $150 per year in electricity.
Installation methods for hydronic systems fall into three categories:
- Wet installation: Tubing is embedded directly in a poured concrete slab, typically 4 inches thick. The concrete provides significant thermal mass, storing heat and releasing it gradually for stable, long-lasting warmth. This method is ideal for new construction on grade.
- Thin-slab installation: Tubing is covered with a 1.5-inch layer of self-leveling gypcrete or lightweight concrete poured over an existing subfloor. This approach adds less weight and height than a full slab, making it suitable for retrofits and upper-story installations.
- Dry installation: Tubing sits in pre-grooved plywood or polystyrene panels or between floor joists with aluminum heat transfer plates that conduct warmth from the tubing to the floor surface. Dry systems install faster, add minimal floor height (as little as 3/8 inch for above-subfloor panels), and weigh significantly less. They respond more quickly to thermostat changes but store less heat than wet systems.
System design considerations include loop length (typically 200 to 300 feet per loop to maintain balanced flow), tube spacing (6 inches on center for high heat demand, 9 to 12 inches for moderate loads), detailed room-by-room heat loss calculations, and proper water temperature settings. Integration with weather compensation controls and smart home platforms is now standard practice in quality installations.
Pros: Highest efficiency for whole-house heating, long lifespan (tubing warranties of 25 to 50 years), compatible with renewable heat sources, excellent comfort.
Cons: Higher upfront cost ($6 to $16 per square foot installed), complex design and installation, potential for leaks requiring professional repair, slower response time in wet installations.
Electric Radiant Floor Heating
Electric radiant floor heating uses resistance heating cables or pre-assembled mats to generate warmth directly beneath the floor surface. It is most commonly used for supplemental heating in individual rooms such as bathrooms, kitchens, and entryways.
Key components include:
- Heating cables or mats: Resistance wires rated at 10 to 15 watts per square foot for most residential applications. Cable mats feature heating wire pre-attached to a fiberglass mesh at fixed spacing (typically 3 inches on center), simplifying layout. Loose cable systems allow custom spacing for irregular room shapes. Most systems operate at 120V for areas under 150 square feet and 240V for larger zones.
- Thermostat: Controls on/off cycling and scheduling. Programmable and smart thermostats with Wi-Fi connectivity, learning algorithms, and smartphone app integration are now standard. Many models support voice control through platforms like Amazon Alexa and Google Home.
- Floor sensor: A temperature probe embedded in the floor that monitors surface temperature independently from air temperature. This prevents overheating and protects sensitive flooring materials. Dual-sensing thermostats that read both floor and ambient air temperature provide the most precise control.
Installation methods for electric systems are straightforward:
- Heating mats or cables embedded in thin-set mortar beneath tile or stone floors, adding less than 1/4 inch of height.
- Systems placed under floating laminate or engineered wood floors with a thin insulating underlayment beneath the heating element to direct warmth upward.
Pros: Lower upfront cost ($5 to $10 per square foot installed), simple installation suitable for skilled DIYers, fast response time (15 to 30 minutes to reach set temperature), no boiler or plumbing required, zero maintenance on the heating element itself.
Cons: Higher operating cost due to electricity prices (typically $0.10 to $0.30 per kWh depending on region), impractical for whole-house heating in most climates, heating cables cannot be repaired if damaged after floor installation.
Emerging Technologies
Recent developments include graphene-enhanced heating films that offer thinner profiles and faster heat-up times, as well as continued improvements in heat pump integration through low-temperature hydronic systems optimized for radiant applications. The growing adoption of air-to-water heat pumps specifically designed for radiant floor heating has expanded in North America since 2023, offering an all-electric pathway that pairs naturally with the low supply temperatures radiant floors demand.
Installation Considerations
General Preparation
Regardless of system type, proper preparation is essential for long-term performance:
- Subfloor preparation: The subfloor must be clean, dry, and level within 1/4 inch over 10 feet. Uneven surfaces cause inconsistent heat distribution and can damage tubing or cables.
- Insulation: Installing rigid foam insulation (minimum R-10 for slab-on-grade, R-5 for above-grade floors) beneath the heating system prevents downward heat loss and directs energy into the living space. Without insulation, 20% to 50% of the heat can be lost downward.
- Moisture barrier: A 6-mil polyethylene vapor barrier is essential in basement and crawl space installations to prevent moisture migration that can damage flooring and reduce system efficiency.
Hydronic Installation Details
For wet installations, tubing is secured to the subfloor or rebar grid using plastic clips, zip ties, or staples spaced every 24 to 36 inches. The system must be pressure tested at 60 PSI for a minimum of 24 hours before concrete is poured. During the pour, tubing should be pressurized to 30 PSI to prevent collapse. Concrete curing requires a minimum of 28 days before the system is brought up to operating temperature, and the initial heat-up should increase water temperature by no more than 5°F per day.
For thin-slab installations, a bonding agent is applied to the existing subfloor, wire mesh reinforcement is laid over the tubing, and self-leveling compound is poured to a depth of 1 to 1.5 inches. The material must be allowed to cure per the manufacturer’s specifications before flooring installation.
For dry installations, pre-grooved panels or aluminum heat transfer plates are positioned between or over joists, and tubing is pressed into the grooves. Every loop must connect back to the manifold without splices within the floor assembly.
Electric Installation Details
Layout planning should avoid placing heating elements under fixed objects such as toilets, vanities, and bathtubs, where trapped heat can cause damage. The heating cable or mat resistance must be tested with a multimeter before installation, after securing to the subfloor, and again after applying thin-set mortar or self-leveling compound. Acceptable resistance readings should fall within 10% of the manufacturer’s specified value. All wiring must comply with the National Electrical Code (NEC) and local electrical regulations, and a dedicated circuit with appropriate breaker sizing is required.
Flooring Material Compatibility
Not all flooring materials perform equally over radiant heat:
- Tile and stone: Ideal choices with high thermal conductivity (1.0 to 2.5 W/mK) and no maximum temperature restrictions for standard ceramic or porcelain tile.
- Engineered hardwood: Performs well if the surface temperature stays below 80°F to 85°F. Quarter-sawn and rift-sawn boards resist warping better than flat-sawn.
- Laminate: Compatible with RFH if rated by the manufacturer. Maximum surface temperature is typically 80°F to 82°F.
- Carpet: Acts as an insulator, reducing heat transfer. Total carpet-plus-pad R-value should not exceed R-2.5 for acceptable performance.
- Vinyl and LVP: Most luxury vinyl products are compatible up to 80°F to 85°F surface temperature. Always verify manufacturer approval.
Adhesives and underlayments must be rated for use with radiant heating to prevent degradation from repeated thermal cycling.
Control Systems
Thermostats and Zoning
Effective control is critical to comfort and efficiency. Modern RFH thermostats range from basic non-programmable units to smart thermostats with learning algorithms that anticipate heating needs based on occupancy patterns and weather forecasts. Zoning allows independent temperature control in different rooms or areas, preventing energy waste in unoccupied spaces. A typical residential hydronic system may have 3 to 8 zones, each controlled by its own thermostat and zone valve or actuator at the manifold.
Hydronic System Controls
- Mixing valves: Thermostatic or motorized valves that blend hot boiler water (140°F to 180°F) with cooler return water to deliver the appropriate supply temperature (typically 90°F to 130°F) to the floor loops.
- Variable-speed pump control: ECM circulators that ramp up or down based on the number of active zones and heat demand, reducing electricity consumption by up to 80% compared to fixed-speed pumps.
- Outdoor reset control: Automatically adjusts supply water temperature based on outdoor air temperature. As outdoor temperatures rise, the controller lowers the supply water temperature, preventing overheating and saving energy. For example, the system might supply 120°F water when it is 10°F outside and only 90°F water at 40°F outside.
Electric System Controls
Electric systems rely on floor sensors to maintain surface temperature within a set range (typically 75°F to 85°F) and prevent overheating that could damage flooring. Ground-fault circuit interrupter (GFCI) protection is required by code to guard against electrical hazards. Timer-based controls and smart scheduling help manage electricity costs by heating floors during off-peak rate periods where time-of-use pricing is available.
Troubleshooting and Maintenance
Hydronic Systems
Common issues include air locks that reduce circulation, pump failures, and low system pressure indicating a leak. Annual maintenance should include checking system pressure (typically 12 to 20 PSI when cold), bleeding air from the manifold, verifying pump operation, inspecting the expansion tank, and testing the mixing valve. Flushing the system every 3 to 5 years with a cleaning solution prevents scale buildup and maintains heat transfer efficiency. Adding an appropriate inhibitor protects against corrosion and biological growth.
Electric Systems
If a zone stops heating, a multimeter can check cable continuity and insulation resistance. An open circuit indicates a cable break, which can be located with a thermal imaging camera or a time-domain reflectometer (TDR). Faulty thermostats are the most common point of failure and are easily replaced. Periodic inspection of wiring connections at the thermostat and junction box helps prevent problems before they occur.
Common Misconceptions
- “Radiant floor heating is always expensive to run.” Hydronic systems powered by heat pumps, solar thermal, or high-efficiency condensing boilers can cost less to operate than forced-air systems. Electric systems are more expensive to run but are typically used for small areas where total energy consumption remains modest.
- “Radiant floors heat rooms instantly.” RFH systems, especially wet hydronic installations with significant thermal mass, may take 30 minutes to several hours to bring a room up to temperature. However, the stable, even heat they provide often feels more comfortable than rapid forced-air heating.
- “Radiant floor heating only works in new construction.” Dry-installation hydronic systems and electric mats are specifically designed for retrofit applications, adding minimal floor height and weight.
- “All radiant floor systems perform the same.” Performance varies dramatically based on system type, heat source, installation method, floor covering, insulation, and control strategy. Proper engineering and design are essential.
Practical Applications
- Residential: Whole-house hydronic heating in cold climates, electric floor warming in bathrooms and kitchens, basement slab heating to eliminate cold-floor discomfort.
- Commercial: Office buildings, schools, hospitals, and retail spaces benefit from even heating, reduced noise, and improved air quality.
- Industrial and outdoor: Warehouse heating, aircraft hangars, and hydronic snow melting systems for driveways, sidewalks, and loading docks.
A common success scenario involves homeowners installing electric radiant mats in a bathroom during a tile renovation. With a total cost of $500 to $1,200 for materials and a smart thermostat programmed to warm the floor each morning, the system delivers noticeable comfort at an operating cost of roughly $10 to $20 per month during the heating season.
Related Topics
Radiant floor heating connects to several related HVAC and energy technologies, including hydronic snow melting systems, radiant wall and ceiling heating panels, geothermal heating and cooling, and solar thermal systems for combined space heating and domestic hot water production.
Key Takeaways
Radiant floor heating offers superior comfort, quiet operation, and strong energy efficiency potential when properly designed and installed. Hydronic systems are best suited for whole-house heating and large projects, while electric systems excel in smaller supplemental applications. Successful installations depend on accurate heat loss calculations, appropriate insulation, compatible flooring materials, and well-configured controls including zoning and outdoor reset. Whether for new construction or retrofit, consulting with a qualified HVAC professional who specializes in radiant heating ensures the system is correctly sized, properly installed, and optimally controlled for decades of reliable, comfortable warmth.