Welcome. As an HVAC professional with decades in the field, I’ve seen my share of ductwork. One area that causes a lot of confusion for homeowners and even some newer technicians is understanding airflow, especially when it comes to flexible ducting. You often hear terms like CFM, or cubic feet per minute, thrown around, and it can feel like you need a degree in fluid dynamics to figure it out. My goal today is to demystify the flex duct CFM chart, explain why it matters, and give you the knowledge you need to talk intelligently about your home’s HVAC system.
I remember a job down in Phoenix a few years back. The homeowner complained one bedroom was always stifling hot, no matter how hard the AC ran. When I got into the attic, I found a tangled mess of undersized flex duct snaking a good 40 feet to that bedroom, with about three sharp 90-degree bends in it. The original installer had clearly just pulled the cheapest, most convenient duct from the truck. Looking at a CFM chart would have immediately told them that an 8-inch flex duct, stretched that far with those bends, was never going to deliver the required airflow to properly cool that room. We ended up upsizing to a 10-inch duct, straightened out the run as much as possible, and the homeowner finally got relief. That’s a real-world example of why understanding CFM and duct sizing isn’t just theory; it directly impacts your comfort and utility bills.
Key Highlights
- CFM (Cubic Feet per Minute) measures the volume of air flowing through your ducts, crucial for efficient heating and cooling.
- Flex duct CFM charts help match duct size to required airflow, preventing common comfort issues like hot or cold spots.
- Key factors like duct length, bends, internal friction, and static pressure significantly affect airflow in flexible ducts.
- Proper installation techniques, such as minimizing bends and ensuring taut runs, are vital for maximizing flex duct performance.
- Calculating your home’s specific CFM needs requires understanding heating and cooling loads, often best determined by an HVAC professional.
- Oversizing or undersizing ducts leads to inefficiency, increased energy costs, and reduced equipment lifespan.
What is CFM and Why is it Important for Flex Ducts?
CFM, or Cubic Feet per Minute, is simply a measurement of the volume of air that moves through your HVAC system’s ducts every minute. Think of it like this: if you have a garden hose, the CFM would be how many gallons of water flow out of it in a minute. For your HVAC system, it’s about how much conditioned air gets delivered to each room. Every furnace and air conditioner is designed to move a specific amount of air to operate efficiently. Your ductwork needs to be able to handle that volume of air.
Why is CFM so important for flex ducts specifically? Well, flexible ducts, while convenient for installation, have higher internal resistance to airflow compared to rigid sheet metal ducts. Their corrugated interior surface creates more friction, and they’re more susceptible to kinks, sags, and sharp bends which all impede airflow. If your flex ducts are too small for the required CFM, or if they’re installed poorly, your system has to work harder to push the air. This leads to several problems:
- Uneven Temperatures: Some rooms get too much air, others not enough, leading to hot or cold spots in your home.
- Reduced Efficiency: Your HVAC unit runs longer and consumes more energy trying to reach thermostat settings, increasing your utility bills.
- Increased Wear and Tear: The blower motor in your furnace or air handler works under strain, which can shorten its lifespan.
- Noise Issues: High airflow velocity in undersized ducts can create whistling or humming sounds.
- Poor Air Quality: Insufficient airflow can affect the performance of your filtration system, leading to poorer indoor air quality over time.
Understanding CFM ensures your system delivers the right amount of conditioned air to maintain comfort and operate as designed. It’s the baseline for a comfortable and efficient home.
How to Read and Use a Flex Duct CFM Chart Effectively
A flex duct CFM chart is a tool that shows you the maximum recommended airflow for different sizes of flexible ductwork, taking into account common factors like duct length and static pressure. These charts aren’t complex once you know what you’re looking at. Typically, a chart will list duct diameters (like 6-inch, 8-inch, 10-inch) along one axis, and then show corresponding CFM values. Sometimes, charts will also incorporate static pressure loss or duct velocity.
Key Elements of a CFM Chart:
- Duct Diameter: This is the internal diameter of the flex duct, usually measured in inches. A larger diameter duct can handle more CFM.
- CFM Value: This is the airflow capacity. The chart will tell you, for example, that a 8-inch flex duct might carry 200 CFM at a certain pressure loss, while a 10-inch might carry 350 CFM under similar conditions.
- Friction Loss (or Static Pressure Loss): Air moving through any duct loses pressure due to friction with the duct walls. This is measured in inches of water column (in. w.c.) per 100 feet of duct. Charts often use a standard friction loss value, like 0.10 in. w.c./100 ft, which is a common design target for residential systems. The higher the friction loss, the harder the fan has to work.
- Air Velocity: This is how fast the air is moving inside the duct, typically measured in feet per minute (FPM). Extremely high velocity can create noise, while very low velocity might not distribute air effectively. Residential ducts usually aim for velocities between 600-900 FPM for supply runs and 500-700 FPM for return runs.
Using the Chart:
To use a chart, you first need to know the target CFM for a specific room or area. We’ll discuss how to calculate that later. Once you have the CFM, you find the duct diameter on the chart that corresponds to or exceeds your required CFM, while staying within acceptable friction loss and velocity ranges. For example, if you need 150 CFM for a bedroom, and your chart indicates a 6-inch flex duct can handle 120 CFM at typical design conditions, you’d know a 6-inch is too small. You would then look at the next size up, perhaps an 8-inch, which might handle 200 CFM. That 8-inch duct would be the appropriate choice, as it meets or exceeds the demand without excessive velocity.
It’s important to remember that these charts usually represent ideal conditions. Your real-world installation, with its specific bends, lengths, and connection points, will affect the actual airflow. Always aim to select a duct size that gives you a little buffer. Don’t size it right to the edge of its capacity. Remember, you can always restrict airflow slightly with a damper if there’s too much, but you can’t increase airflow if the duct itself is too small.
Understanding the Factors Affecting Flex Duct Airflow
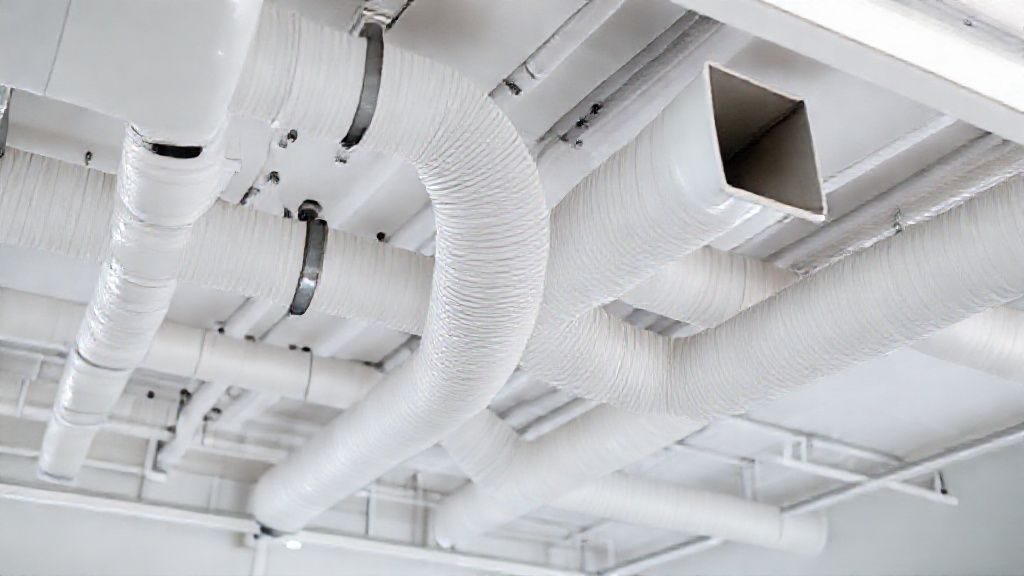
Flexible ducts are practical, but they come with specific considerations that impact airflow more significantly than rigid ducts. Neglecting these factors can quickly undermine even the most carefully selected duct size.
1. Duct Length
The longer the duct run, the more internal friction the air encounters. This friction causes a pressure drop, meaning less air pressure reaches the end of the duct. Imagine trying to push water through a very long hose versus a short one; the pressure at the end of the long hose will be lower. For flex ducts, every foot adds resistance, so shorter runs are always better for optimal airflow.
2. Number and Sharpness of Bends
This is a big one. Every bend in a duct run creates turbulence and resistance, significantly reducing airflow. A sharp 90-degree bend in flex duct is particularly problematic because the corrugated interior structure exacerbates the pressure loss. Two gradual 45-degree bends are always better than one sharp 90-degree bend. Minimizing bends and ensuring they are as gradual as possible is critical for maintaining good CFM.
3. Duct Material and Interior Surface
Flexible ducts typically have a helically wound wire core with a plastic or metallic film lining. This corrugated interior surface creates more friction than the smooth interior of rigid sheet metal ducts. This inherent friction means a flex duct of the same nominal diameter will deliver less CFM than a rigid duct of the same diameter over the same length. This is why CFM charts specifically for flex ducts are so important.
4. Kinks and Sags
Flex ducts are prone to kinking or sagging if not properly supported. A kink dramatically reduces the effective cross-sectional area of the duct, acting like a severe restriction. Sags allow the duct to compress and create resistance. Proper suspension and support, ensuring the duct is pulled taut and smooth, are essential.
5. Static Pressure
Static pressure is the resistance to airflow in your entire duct system, including the supply ducts, return ducts, filter, coils, and registers. Your HVAC system’s fan has a limited ability to overcome this resistance. If the total static pressure is too high, the fan cannot move the intended volume of air. Undersized or poorly installed flex ducts contribute significantly to overall static pressure. Understanding how much static pressure your system is designed for (often found in the manufacturer’s specifications) is crucial.
6. Obstructions and Dirt
Over time, dust, debris, and even insulation can accumulate in ducts, especially in poorly sealed flex ducts. This acts as an obstruction, reducing the effective area and increasing resistance. Regular filter changes and occasional duct cleaning can help mitigate this, though proper installation to prevent debris ingress is the first line of defense.
By keeping these factors in mind, you can appreciate why proper sizing and installation of flexible ducts are so vital to your HVAC system’s performance. It’s not just about getting air to a room; it’s about getting the right amount of air, efficiently.
Common Flex Duct Sizes and Their CFM Capacities
When you’re dealing with residential HVAC, you’ll typically encounter a range of flex duct sizes. It’s important to understand that the CFM capacities I’m about to give are general guidelines. The actual capacity will vary based on factors like duct length, the number of bends, and the design static pressure of your system (usually around 0.10 inches of water column per 100 feet for flexible ducts). Always refer to specific manufacturer charts or industry standards for precise figures.
Typical Flex Duct Sizes and Their Approximate CFM Ranges (at ~0.10 in. w.c./100 ft friction loss):
- 4-inch Flex Duct: This size is generally used for very small areas or as a dedicated exhaust line, not typically for main supply or return air in a standard comfort system. It’s often too restrictive for conditioned air distribution. Expect around 40-80 CFM. If you see this as a main supply run to a bedroom, that’s often a red flag for insufficient airflow.
- 5-inch Flex Duct: Similar to 4-inch, sometimes used for smaller secondary runs or bath exhausts. Its CFM capacity is still quite limited. Approximately 70-120 CFM.
- 6-inch Flex Duct: A very common size for individual supply runs to smaller rooms like bathrooms or walk-in closets, or smaller bedrooms. It’s a workhorse, but it has its limits. Generally capable of delivering about 100-200 CFM. This is often the smallest diameter you’d want for a main room supply.
- 7-inch Flex Duct: Less common than 6-inch or 8-inch, but sometimes used. It offers a slight bump in capacity over a 6-inch. You might see around 150-250 CFM.
- 8-inch Flex Duct: This is often the go-to size for standard bedrooms, larger bathrooms, or smaller living areas. It strikes a good balance between cost, ease of installation, and airflow capacity. Typical range is 200-350 CFM. This is a very common size for most residential supply runs.
- 10-inch Flex Duct: Used for larger rooms like living rooms, master bedrooms, or smaller open-plan areas. It provides a significant increase in airflow capacity. Expect approximately 300-550 CFM. Sometimes also used for short, branch return air ducts.
- 12-inch Flex Duct: Good for larger open-concept spaces, bigger living rooms, or sometimes as a small main trunk line or for return air ducts. Its capacity is substantial. Generally around 500-800 CFM.
- 14-inch Flex Duct and Larger: These sizes are typically used for main trunk lines, large common areas, or for return air ducts, especially if you have a single central return. They can handle well over 800 CFM, sometimes reaching 1200 CFM or more depending on the specific product and conditions.
It’s important to match these capacities with the actual CFM requirements of each space in your home. Undersizing leads to poor performance, while oversizing can reduce air velocity too much, causing air to “dump” rather than mix properly in a room, and can be more costly to install.
Tips for Optimal Flex Duct Installation and Performance
Proper installation is paramount for flexible ductwork. Even perfectly sized flex duct can underperform if it’s not installed correctly. I’ve seen countless installations where a few simple adjustments would have made a world of difference in system efficiency and homeowner comfort.
1. Keep Runs as Short and Straight as Possible
This is the golden rule. Every foot of duct and every bend adds resistance. Plan your duct runs to be the shortest path from the plenum (the main distribution box) to the register. Avoid unnecessary turns.
2. Minimize Bends and Make Them Gradual
Sharp 90-degree bends are airflow killers in flex duct. They cause significant pressure drop. If you must make a turn, use two 45-degree bends instead of one 90-degree. Ensure bends have a large radius – don’t bend the duct sharply at a corner. Give it a gentle, sweeping curve. Imagine the air flowing through; it wants a smooth path.
3. Pull the Inner Liner Taut
Flexible duct has an inner liner, insulation, and an outer vapor barrier. The inner liner must be pulled taut and smooth, without kinks or sags. If the inner liner is bunched up, it creates excessive friction and restricts airflow, regardless of the outer diameter. This is a very common oversight. Gently stretch the duct before connecting it.
4. Support the Duct Properly
Flex duct needs continuous support to prevent sagging and kinking. Use proper hangers or straps at regular intervals, typically every 4 to 5 feet, and immediately before and after bends. Never let a flex duct lay directly on insulation or sag between joists. This is crucial for maintaining its circular shape and full internal diameter.
5. Seal All Connections Securely
Air leaks are efficiency leaks. Every connection point – at the plenum, at the register boot, and any splices – must be sealed. Use mastic, specialized duct sealant, or a high-quality UL-listed foil tape. Zip ties alone are not enough for a permanent seal. Follow up with mastic or tape over the zip tie connection.
6. Maintain Proper Insulation and Vapor Barrier
Most flex duct comes pre-insulated. Ensure the insulation isn’t compressed, as this reduces its R-value. The outer vapor barrier needs to be intact to prevent moisture intrusion, especially in unconditioned spaces like attics or crawl spaces. Tears in the vapor barrier can lead to condensation and moisture problems. If you’re looking at specific components for your system, you can find details on an hvac split unit system and its various parts, where proper sealing and insulation are just as critical.
7. Avoid Crushing or Puncturing
Be careful during and after installation not to step on, crush, or puncture the duct. Even small holes can lead to significant air loss and moisture issues. A good visual inspection after installation is always a smart move.
8. Connect to Collars, Not Directly to Plenum Walls
Always connect flex ducts to takeoff collars or boots, not by simply cutting a hole in the plenum and trying to tape to it. Collars provide a smooth, secure transition for airflow and a reliable connection point.
Adhering to these installation best practices won’t just improve airflow; it will enhance your system’s overall efficiency, longevity, and your comfort. If you have any doubts about your current ductwork or need advice on sizing, don’t hesitate to contact us for a quote. Professional insight is often worth it.
Calculating CFM Requirements for Your Specific HVAC System
Getting the right amount of air to each room starts with knowing how much air each room actually needs. This isn’t just guesswork; it’s based on the heating and cooling load of each space. While a full, precise load calculation (known as a Manual J calculation in the industry) is complex and best left to a professional, you can understand the basic principles.
Understanding Heating and Cooling Loads
Every room in your house gains or loses heat differently. Factors influencing this include:
- Window Size and Orientation: South-facing windows, especially those without shading, contribute to significant heat gain in summer. The target ac unit window considerations are crucial here.
- Insulation Levels: Walls, ceilings, and floors with poor insulation will transfer more heat.
- Room Volume: Larger rooms naturally require more air to condition.
- Number of Occupants: People generate heat.
- Internal Heat Gains: Appliances, lighting, and electronics all add heat to a space.
- Exterior Walls and Exposure: Rooms with more exterior walls will have higher loads.
- Climate Zone: Living in a hot climate like Florida means higher cooling loads, while a cold climate like Minnesota means higher heating loads.
Rough Estimation Methods (for understanding, not precise sizing)
For a very rough estimate, many sources suggest a range of 0.8 to 1.2 CFM per square foot for typical residential applications. For example, a 10×12 foot bedroom (120 square feet) might need between 96 and 144 CFM. However, this is a very generalized rule of thumb and doesn’t account for unique room characteristics.
A slightly more refined method involves estimating CFM based on the required BTUs for heating or cooling a room. A common approximation is that one ton of air conditioning (12,000 BTU/hr) requires about 400 CFM of airflow. If you know the approximate BTU load for a room (e.g., from an energy audit or a very simplified online calculator), you can work backward.
For example, if a room requires 6,000 BTU/hr of cooling, you could estimate the CFM needed as:
(6,000 BTU/hr / 12,000 BTU/hr per ton) * 400 CFM per ton = 0.5 tons * 400 CFM/ton = 200 CFM.
Again, these are simplifications. A professional Manual J calculation considers all the factors mentioned above to determine the precise heating and cooling load for each room, expressed in BTUs. From these BTU loads, the required CFM for each supply register can be accurately determined, typically using a target supply temperature difference (e.g., 20 degrees F between supply air and room air for cooling).
The Role of the HVAC System’s Total CFM
Your entire HVAC system (furnace or air handler) has a total CFM output. For a 3-ton AC unit, for instance, the total CFM moved by the fan might be around 1200 CFM (3 tons * 400 CFM/ton). The sum of all the individual room CFM requirements must add up to this total CFM output, taking into account the necessary return air capacity as well. If your main unit moves 1200 CFM, but your total supply ductwork can only efficiently deliver 900 CFM, you have a problem: reduced efficiency, airflow issues, and potential equipment damage.
For a detailed assessment and precise sizing, especially if you’re installing a new system or upgrading, it’s always best to rely on a certified HVAC technician. They have the tools and expertise to perform a comprehensive load calculation and then size your ductwork accordingly using professional CFM tables and software.
When to Consult an HVAC Professional for Ductwork Sizing
While understanding flex duct CFM charts and basic principles is valuable for any homeowner, there are definitive times when you absolutely should bring in a qualified HVAC professional. Ductwork sizing is not a DIY project if you want optimal performance, efficiency, and comfort from your system. It’s more complex than many realize, and mistakes can be costly.
Key Scenarios Where Professional Help is Essential:
- New HVAC System Installation: If you’re installing a brand-new furnace, air conditioner, or hvac split unit system, the ductwork should be designed specifically for that unit and your home. This involves a comprehensive load calculation (Manual J) and precise duct sizing (Manual D) for both supply and return air. This ensures the equipment operates at its rated efficiency and delivers comfort evenly.
- Major Renovations or Additions: Adding rooms, finishing a basement or attic, or significantly reconfiguring your home’s layout changes the heating and cooling loads. Existing ductwork may be inadequate, and new duct runs will need to be properly sized and integrated into the system.
- Persistent Comfort Issues: If you have rooms that are consistently too hot or too cold, excessive dust, high utility bills, or noisy vents, these are all signs of potential ductwork problems. An HVAC professional can diagnose these issues, which often stem from improper sizing, installation, or leaks.
- Upgrading or Changing Equipment Size: If you’re replacing an old AC unit with a new, higher-efficiency one, or upsizing/downsizing your furnace, the existing ductwork might not be appropriate. A new unit often requires different airflow characteristics.
- Concerns About Air Quality: While not directly about CFM, proper airflow is fundamental to effective air filtration. If you’re experiencing poor indoor air quality despite changing filters, it could be an airflow issue.
- Visible Ductwork Problems: If you notice sagging, crushed, or visibly damaged ducts, especially flexible ones, it’s time for a professional assessment. They can repair or replace sections and ensure the rest of the system is optimized.
- High Energy Bills: Inefficient ductwork (leaks, undersizing, poor installation) is a major contributor to high energy consumption. If your bills are inexplicably high, a professional can perform diagnostics to identify and rectify duct-related inefficiencies. For context on how much energy your system might be using, you can read up on how many watts does an air conditioner use.
An experienced professional brings not just knowledge of CFM charts, but also practical experience with installation techniques, system balancing, and diagnostic tools to measure actual airflow and static pressure. They can accurately determine required CFMs, select appropriate duct sizes, design efficient layouts, and ensure all connections are sealed and insulated correctly. Investing in professional ductwork design and installation is one of the best ways to protect your HVAC investment and ensure long-term comfort and efficiency. For more insights into optimizing your system, feel free to read our blog for detailed articles and advice.
FAQ
Q1: What happens if my flex ducts are too small (undersized)?
A: If your flex ducts are undersized, your HVAC system’s fan will struggle to push the required volume of air through them. This leads to reduced airflow to the rooms, creating hot or cold spots, longer run times for the unit, increased energy consumption, and premature wear on the blower motor. The air velocity might also increase, leading to noisy vents (whistling).
Q2: Can I use different sizes of flex duct in my home’s system?
A: Yes, absolutely. In fact, it’s common and necessary. Different rooms have different heating and cooling loads, and therefore require different amounts of conditioned air (CFM). A small bathroom might only need a 6-inch duct, while a large living room might need a 12-inch duct. The key is to size each branch duct according to the specific CFM requirements of the room it serves, and to ensure the main trunk lines are appropriately sized to carry the cumulative CFM for all branches.
Q3: How often should I inspect my flexible ductwork?
A: It’s a good idea to visually inspect accessible flexible ductwork every 1-3 years, especially if it’s in an attic, crawl space, or other unconditioned areas. Look for sags, kinks, tears in the outer jacket (vapor barrier), disconnected sections, or signs of pests. If you have any concerns about airflow or comfort, a professional inspection is warranted sooner. Regular HVAC maintenance often includes a quick check of visible ductwork.
Q4: Does the insulation on the outside of flex duct affect CFM?
A: The insulation itself does not directly affect the CFM (airflow volume) as long as it doesn’t compress the inner liner. However, the R-value (insulation rating) of the flex duct significantly impacts the temperature of the air delivered. If the insulation is insufficient or compressed, the conditioned air will lose or gain temperature as it travels through unconditioned spaces, meaning less effective heating or cooling reaches your rooms, requiring more CFM to compensate or longer run times.
Q5: Is it okay to use rigid duct for some runs and flex duct for others?
A: Yes, this is a very common and often optimal approach. Many HVAC systems use rigid sheet metal for main trunk lines due to their superior airflow characteristics (less friction, less prone to sagging/kinking) and then transition to shorter runs of flexible duct for connecting to individual registers. This combines the efficiency of rigid duct with the installation flexibility of flex duct. The key is still proper sizing for each section and ensuring airtight connections between different duct types.
Final Thoughts
Understanding the basics of flex duct CFM charts and the factors influencing airflow isn’t just technical jargon; it’s practical knowledge that empowers you as a homeowner. It helps you recognize when your system might not be performing as it should and allows you to have more informed conversations with HVAC professionals. Proper duct sizing and installation are foundational to an efficient, comfortable home. Skimping on this critical component or getting it wrong means your expensive HVAC equipment will never deliver on its promises, no matter how high its efficiency rating. So, next time you think about your home’s comfort, remember the invisible network of ducts doing the heavy lifting, and appreciate the science behind ensuring every cubic foot of air gets where it needs to go.