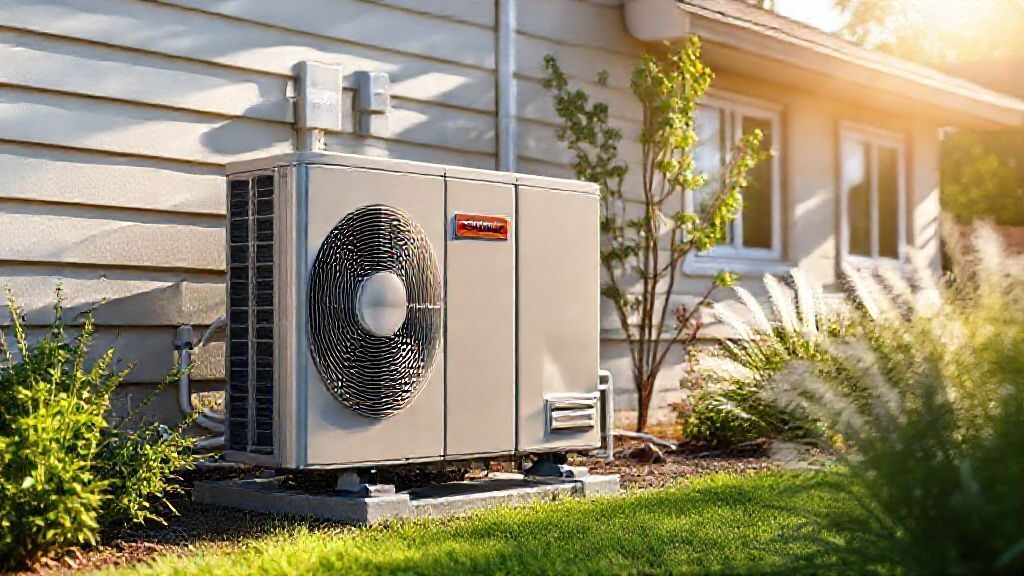
As an HVAC expert with decades of experience, I’ve seen just about everything when it comes to home heating and cooling systems. One component that often gets overlooked, but is absolutely central to a heat pump’s operation, is the condenser unit. When people talk about their “outdoor unit,” they’re usually referring to this piece of equipment. Understanding what it does and how to keep it running smoothly can save you a lot of headaches and money in the long run.
I remember a particular heat pump installation I was called out to inspect in Denver. The homeowners were complaining about poor heating performance in the winter, even though the system was relatively new. After a thorough check, it turned out the outdoor condenser unit was installed too close to a fence, restricting airflow significantly. It was working, but inefficiently, struggling to pull enough heat from the frigid Denver air. A simple repositioning made all the difference, highlighting just how critical proper installation and an unobstructed condenser are for a heat pump’s efficiency and lifespan, regardless of the climate.
Key Highlights
- The heat pump condenser is the outdoor unit that manages heat exchange for both heating and cooling.
- It contains the compressor, coils, fan, and reversing valve.
- In cooling mode, it releases heat from your home; in heating mode, it absorbs heat from outside.
- Common issues include refrigerant leaks, fan motor failure, and dirty coils.
- Regular cleaning and professional maintenance are crucial for efficiency and longevity.
What is a Heat Pump Condenser?
Let’s start with the basics. The heat pump condenser, often simply called the outdoor unit, is the part of your heat pump system that sits outside your home. It’s a vital component that facilitates the transfer of heat between your home’s interior and the outdoor environment. Unlike a traditional air conditioner that only provides cooling, a heat pump condenser unit is designed to work in two directions: it can either remove heat from inside your house and send it outside (cooling mode), or it can extract heat from the outside air and bring it indoors (heating mode).
Think of it as the heart and lungs of your heat pump system when it comes to moving thermal energy. This outdoor unit houses several key components that work in concert to achieve this heat transfer, which we’ll dive into shortly. Its primary job is to condense refrigerant gas back into a liquid state, releasing or absorbing heat in the process, depending on the operational mode. Without a properly functioning condenser, your heat pump simply can’t regulate your home’s temperature effectively, if at all.
The name “condenser” itself gives you a clue about one of its main functions: to condense the refrigerant. When the refrigerant is in a hot, high-pressure gaseous state, it enters the condenser coil. As air flows over these coils, heat is exchanged, and the refrigerant cools down and condenses back into a high-pressure liquid. This process is fundamental to how both air conditioners and heat pumps operate. The crucial difference for a heat pump is that this process can be reversed, making it a truly versatile all-season comfort system.
How Does a Heat Pump Condenser Work?
Understanding how the heat pump condenser works requires a basic grasp of the refrigerant cycle. It’s a continuous loop where a special chemical, refrigerant, changes state between a liquid and a gas, absorbing and releasing heat along the way. This cycle is what allows your heat pump to move heat from one place to another, rather than generating it.
Cooling Mode (Summer Operation)
When your heat pump is set to cool your home, the process goes like this:
- Heat Absorption Indoors: The indoor unit (evaporator coil) absorbs heat from the air inside your house. The liquid refrigerant passing through this coil evaporates, turning into a low-pressure gas as it picks up heat.
- Compression: This low-pressure, warm gaseous refrigerant then travels to the outdoor unit’s compressor. The compressor squeezes the refrigerant, increasing its pressure and temperature significantly. It becomes a hot, high-pressure gas.
- Heat Rejection Outdoors: This hot, high-pressure gas then flows into the condenser coil within the outdoor unit. The fan in the outdoor unit draws ambient air over these hot coils. As the cooler outdoor air passes over the coils, it absorbs heat from the refrigerant. This causes the refrigerant to cool down and condense back into a high-pressure liquid, releasing the heat it picked up from your home into the outside air.
- Expansion and Repetition: The now high-pressure liquid refrigerant moves through an expansion valve (or metering device) which reduces its pressure and temperature, preparing it to absorb more heat in the indoor evaporator coil, and the cycle continues.
So, in cooling mode, the outdoor condenser acts as the heat radiator, dumping unwanted heat from your living space to the outside.
Heating Mode (Winter Operation)
This is where the heat pump truly shines and differentiates itself from a standard AC. In heating mode, the reversing valve in the outdoor unit changes the direction of the refrigerant flow. The roles of the indoor and outdoor coils are essentially reversed:
- Heat Absorption Outdoors: The outdoor coil now functions as the evaporator. Even in cold temperatures, there’s heat energy available in the outside air. The refrigerant, now a cold, low-pressure liquid, flows through the outdoor coil. It absorbs heat from the colder outdoor air, causing it to evaporate and turn into a low-pressure gas.
- Compression: This cooler gaseous refrigerant is then drawn into the compressor, where its pressure and temperature are increased, turning it into a hot, high-pressure gas.
- Heat Rejection Indoors: This hot, high-pressure gas then travels to the indoor coil (now functioning as the condenser). A fan circulates your home’s air over these hot coils. As the air passes, it picks up heat from the refrigerant, warming your home. This process causes the refrigerant to condense back into a high-pressure liquid, releasing its absorbed heat indoors.
- Expansion and Repetition: The high-pressure liquid refrigerant then moves through the expansion valve, its pressure and temperature drop, and it returns to the outdoor coil to absorb more heat, completing the cycle.
In heating mode, the outdoor condenser unit is essentially pulling heat out of the cold outdoor air, concentrating it, and releasing it inside your home. It’s an incredibly efficient way to heat, as it moves heat rather than generating it from scratch.
Components of a Heat Pump Condenser Unit
To really grasp how the condenser works, it helps to understand its individual parts. Each component plays a specific and crucial role in the overall operation.
1. Compressor
This is arguably the most critical component. The compressor is a motor-driven pump that circulates the refrigerant through the system. Its job is to increase the pressure and temperature of the refrigerant gas, preparing it to either release heat (in cooling mode) or absorb heat more effectively (in heating mode). Think of it as the engine of the entire heat pump system. Without the compressor, the refrigerant wouldn’t be able to move, nor would it reach the necessary pressures and temperatures for efficient heat exchange.
2. Condenser Coil (Outdoor Coil)
This is a series of copper tubing with aluminum fins wrapped around it, designed to maximize surface area for heat exchange. In cooling mode, the hot, high-pressure refrigerant gas flows through these coils, and the outdoor fan blows ambient air over them. Heat transfers from the refrigerant to the outdoor air, causing the refrigerant to condense into a liquid. In heating mode, the coil acts as the evaporator, absorbing heat from the outdoor air. Keeping these fins clean and straight is vital for efficiency, as blocked airflow means poor heat transfer.
3. Fan Motor and Fan Blades
Mounted at the top of the outdoor unit, the fan motor drives the fan blades. The fan’s purpose is to draw air over the condenser coil. In cooling mode, it pulls ambient air in and expels warmer air that has absorbed heat from the refrigerant. In heating mode, it draws air over the coil to facilitate the absorption of heat. A failing fan motor or bent blades can severely impair your unit’s ability to transfer heat, leading to reduced efficiency or system failure.
4. Reversing Valve
This component is unique to heat pumps (and not found in standard AC-only condensers). The reversing valve is an electrically controlled valve that allows the heat pump to switch between heating and cooling modes. It literally reverses the flow of refrigerant, changing which coil acts as the evaporator and which acts as the condenser. This is the magic switch that turns your summer cooler into a winter heater.
5. Accumulator/Receiver
While not always a distinct, separately visible component on all units, the accumulator or receiver acts as a storage vessel for refrigerant. An accumulator, typically found on the suction line before the compressor, ensures that only refrigerant in a gaseous state enters the compressor, protecting it from liquid damage. A receiver, usually on the liquid line after the condenser, stores excess liquid refrigerant. These components help manage the refrigerant charge under varying operating conditions.
6. Electrical Components
This category includes a variety of parts like the contactor, run capacitor, start capacitor, and control board. The contactor is an electrical switch that turns the compressor and fan on and off. Capacitors provide the initial electrical boost needed to start the compressor and fan motors, and then help them run efficiently. The control board processes signals from your thermostat and other sensors to manage the unit’s operations. Any failure in these electrical components can cause the entire unit to stop working.
7. Filter Drier
Often located near the outdoor unit or integrated into the refrigerant lines, the filter drier has two critical functions: to remove moisture from the refrigerant and to filter out any contaminants that might be in the system. Moisture in a refrigerant system can cause serious damage, including corrosion and freezing, so the drier is an essential protective component.
Common Heat Pump Condenser Problems & Troubleshooting
Even the most robust systems can develop issues over time. Here are some common problems homeowners encounter with their heat pump condenser units and what they often mean.
1. No Power to the Unit
If your outdoor unit isn’t running at all, the first thing to check is the circuit breaker. Sometimes, a power surge or an electrical fault can trip the breaker dedicated to your outdoor unit. If the breaker is fine, check the disconnect switch near the unit – it might have been accidentally turned off. Beyond these simple checks, it could be a wiring issue, a faulty contactor, or a problem with the control board. For these, it’s time to call a professional.
2. Unit Running But Not Heating/Cooling Effectively
This is a common complaint. If the fan is spinning and the compressor sounds like it’s working, but you’re not getting adequate heating or cooling, several things could be at play:
- Low Refrigerant: A refrigerant leak is a frequent culprit. If the refrigerant level is low, the system can’t effectively transfer heat. You might notice ice forming on the outdoor coil in cooling mode or the indoor coil in heating mode. This needs professional diagnosis and repair, as simply adding refrigerant without fixing the leak is a temporary, harmful solution.
- Dirty Coils: A layer of dirt and debris on the outdoor coil acts as an insulator, preventing efficient heat transfer. Cleaning the coils can often resolve this.
- Blocked Airflow: Shrubs, leaves, or even outdoor furniture too close to the unit can restrict airflow, making the unit work harder and less efficiently. Ensure there’s at least 18-24 inches of clear space around the unit.
- Failed Compressor: In severe cases, the compressor might be running but failing to build sufficient pressure, indicating an internal mechanical failure.
3. Loud Noises (Grinding, Squealing, Buzzing)
- Squealing/Grinding: Often points to a failing fan motor bearing or compressor motor bearing. This requires professional attention before it seizes up completely.
- Buzzing/Humming: Could be an electrical issue, like a failing capacitor or contactor, or the compressor itself struggling to start.
- Rattling: Might be loose fan blades, debris inside the unit, or a loose panel.
4. Frozen Outdoor Coil
While some frost on the outdoor coil in heating mode during cold weather is normal (the defrost cycle should handle it), a heavily frozen coil that doesn’t defrost indicates a problem. This could be due to:
- Low Refrigerant: Again, insufficient refrigerant can cause the coil to run colder than it should.
- Defrost Control Malfunction: The defrost board or sensor might not be telling the unit to enter its defrost cycle.
- Blocked Airflow: Heavy snow or ice buildup, or obstructions around the unit.
- Dirty Air Filter (Indoor Unit): A very dirty indoor filter can restrict airflow across the indoor coil, impacting the entire system’s balance and potentially leading to freezing of the outdoor coil.
5. Short Cycling
This is when your heat pump turns on and off too frequently. It’s inefficient and puts undue wear and tear on the system. Causes can include:
- Improper Sizing: An oversized unit may short cycle because it heats or cools the space too quickly.
- Low Refrigerant: The system struggles to reach temperature and keeps shutting down.
- Thermostat Issues: A faulty thermostat might be misreading temperatures or sending incorrect signals.
- Electrical Problems: Failing capacitors or contactors can cause erratic operation.
6. Refrigerant Leaks
These are serious. Refrigerant is not consumed; it’s contained within a closed loop. If levels are low, there’s a leak. Signs include reduced performance, higher energy bills, and sometimes a hissing sound. Leaks must be found and repaired by a certified technician. Refrigerant is harmful to the environment and improper handling is illegal.
7. Fan Not Spinning
If the compressor is running but the fan isn’t, the unit will quickly overheat and shut down (or perform very poorly). This is often a bad fan motor, a faulty run capacitor for the fan motor, or an obstruction preventing the blades from turning.
For most of these issues, especially those involving refrigerant or complex electrical components, it’s always best to call a qualified HVAC professional. Tampering with refrigerant can be dangerous and illegal, and electrical repairs carry risks.
Maintaining Your Heat Pump Condenser for Peak Performance
Regular maintenance is not just a recommendation; it’s a necessity for ensuring your heat pump condenser runs efficiently, lasts longer, and avoids costly breakdowns. Here’s what you, and a professional, should be doing.
1. Keep the Outdoor Unit Clear
This is something any homeowner can do. Regularly clear away leaves, grass clippings, dirt, and other debris that can accumulate around and on the unit. Ensure there’s at least 18-24 inches of clear space around all sides of the condenser unit. Overhanging branches should be trimmed. This allows for proper airflow, which is critical for efficient heat transfer. Blocked airflow makes the unit work harder, increasing energy consumption and wear.
2. Clean the Condenser Coils and Fins
Over time, dirt, dust, and even pet dander can build up on the outdoor coil’s fins. This acts as an insulating layer, hindering the unit’s ability to exchange heat. You can gently rinse the coils with a garden hose (make sure the power to the unit is off at the disconnect switch first). Be careful not to use high pressure, as it can bend the delicate aluminum fins. If the fins are bent, you can gently straighten them with a fin comb, available at most hardware stores. For a deeper clean, especially if there’s stubborn grime, professional coil cleaning is recommended.
3. Check for Leaks and Damage
While you shouldn’t mess with refrigerant lines, you can visually inspect the unit for any obvious signs of damage or leaks. Look for oil stains on the refrigerant lines or around the outdoor unit, which can indicate a refrigerant leak. Also, listen for unusual sounds. Catching these issues early can prevent more significant problems.
4. Annual Professional Tune-Up
This is the single most important maintenance step. Schedule a professional HVAC technician to inspect and service your heat pump condenser annually, ideally before the heating or cooling season begins. During this service, a technician will:
- Check Refrigerant Levels: They will verify the refrigerant charge and check for leaks using specialized tools. If a leak is found, they will repair it and then recharge the system.
- Inspect Electrical Components: They will check the contactor, capacitors, wiring, and other electrical connections for wear, corrosion, or damage. Faulty electrical components can lead to system failures.
- Lubricate Motors: If your fan motor has lubrication ports, the technician will ensure they are properly lubricated.
- Clean and Inspect Coils: They’ll perform a thorough cleaning of both indoor and outdoor coils and check the fins for damage.
- Test Defrost Cycle: For heat pumps, ensuring the defrost cycle is working correctly is crucial for winter efficiency.
- Check Overall System Operation: They’ll measure temperatures, pressures, and airflow to ensure the system is operating within manufacturer specifications.
- Inspect the Reversing Valve: Make sure it’s switching smoothly between modes.
A professional tune-up ensures everything is running as it should, catches small problems before they become big ones, and helps maintain peak efficiency, which means lower energy bills. If you’re looking for the best hvac service, choose a reputable company with experienced technicians.
5. Replace Air Filters Regularly (Indoor Unit)
While the air filter is located in your indoor unit (air handler or furnace), a dirty filter restricts airflow throughout the entire system. This forces your outdoor condenser unit to work harder, reduces efficiency, and can even contribute to issues like coil freezing. Check your filter monthly and replace it every 1-3 months, depending on usage, pets, and allergies.
When to Repair vs. Replace Your Heat Pump Condenser
This is a common dilemma for many homeowners. Deciding whether to repair a failing heat pump condenser or replace it with a new one depends on several factors.
1. Age of the Unit
Heat pump condensers typically last 10-15 years, sometimes up to 20 with excellent maintenance. If your unit is approaching or beyond the 10-year mark and requires a significant repair (like a compressor replacement), it often makes more financial sense to replace the entire unit. Components wear out over time, and a repair on an older unit might just be the first of many.
2. Cost of Repair vs. Cost of New Unit
Get a clear estimate for the repair. If the repair cost is more than 30-50% of the cost of a new unit, replacement is usually the wiser choice. This is especially true for major components like the compressor, which can be very expensive to replace. Consider the long-term investment. If you’re wondering how much is a ac unit for a house, remember that heat pumps often have similar costs to AC units but offer dual functionality.
3. Efficiency Considerations
Older units, even when working perfectly, are significantly less efficient than modern heat pumps. Today’s units boast much higher Seasonal Energy Efficiency Ratio (SEER) and Heating Seasonal Performance Factor (HSPF) ratings. Replacing an old unit with a high-efficiency model can lead to substantial savings on your energy bills, often offsetting part of the replacement cost over its lifespan. These savings can make replacement a better long-term financial decision.
4. Availability of Parts
For very old units, finding replacement parts, especially for proprietary components, can become difficult or impossible. If a crucial part is obsolete, replacement becomes your only option.
5. Matching Indoor Unit (If Only Replacing Outdoor)
It’s generally recommended to replace both your indoor (air handler or furnace coil) and outdoor units simultaneously. HVAC systems are designed to be “matched” for optimal performance and efficiency. Replacing only the outdoor condenser unit with a newer, more efficient model while keeping an old indoor unit can lead to reduced efficiency, increased wear on both components, and sometimes even voided warranties. Many manufacturers, like LG, stipulate that certain components must be matched for the lg manufacturing warranty to remain valid.
Ultimately, a professional HVAC technician can help you weigh these factors and provide a detailed cost-benefit analysis tailored to your specific situation, helping you make an informed decision.
FAQs About Heat Pump Condensers
What’s the difference between an AC condenser and a heat pump condenser?
The main difference is the reversing valve. An AC condenser only moves heat in one direction: from inside your home to outside. A heat pump condenser includes a reversing valve that allows it to reverse the flow of refrigerant, enabling it to either cool your home by moving heat out or heat your home by moving heat in from the outside air.
How long do heat pump condensers last?
A well-maintained heat pump condenser typically lasts between 10 to 15 years, and sometimes up to 20 years. Factors influencing lifespan include climate, usage, regular maintenance, and the quality of the original installation.
Why is my heat pump condenser freezing up?
While some frost is normal on the outdoor coil in heating mode during very cold weather (and should be handled by the defrost cycle), a heavily frozen-over coil indicates a problem. Common causes include low refrigerant levels (a leak), a faulty defrost control board or sensor, restricted airflow due to dirt or obstructions, or a very dirty indoor air filter.
Can I clean my condenser coil myself?
Yes, you can perform basic cleaning. Always turn off the power to the unit at the disconnect switch first. Remove any debris from around the unit. Gently rinse the outdoor coil fins with a garden hose. Avoid using high-pressure washers, as they can bend the delicate fins. For deeper cleaning or if the coils are heavily soiled, it’s best to call a professional. They have specialized cleaners and tools, and can perform the job without damaging components.
What size heat pump condenser do I need?
Sizing is critical. An undersized unit won’t keep your home comfortable, while an oversized unit will short cycle, leading to inefficiency and premature wear. Sizing requires a professional load calculation that considers factors like your home’s square footage, insulation, window efficiency, climate, and more. HVAC professionals use calculations like the Manual J to determine the appropriate BTU capacity. For example, understanding what a one ton btu capacity means in relation to your home’s cooling/heating needs is part of this process.
Final Thoughts
The heat pump condenser is a remarkable piece of engineering that plays a dual role in keeping your home comfortable year-round. It’s a significant investment, and like any complex machinery, it needs attention. Understanding its basic operation, recognizing common issues, and committing to regular maintenance are key to maximizing its lifespan and efficiency. Don’t underestimate the power of a professional tune-up; it’s the best way to ensure your system is running optimally and to catch potential problems before they escalate. If you have questions about your specific system or need professional help, don’t hesitate to reach out. For personalized advice or to schedule an inspection, you can always contact us for a quote.